| 일 | 월 | 화 | 수 | 목 | 금 | 토 |
|---|---|---|---|---|---|---|
| 1 | 2 | 3 | 4 | 5 | 6 | 7 |
| 8 | 9 | 10 | 11 | 12 | 13 | 14 |
| 15 | 16 | 17 | 18 | 19 | 20 | 21 |
| 22 | 23 | 24 | 25 | 26 | 27 | 28 |
Tags
- 그래프
- 스토어드 프로시저
- 다익스트라
- union find
- Dijkstra
- String
- MYSQL
- Two Points
- SQL
- Stored Procedure
- two pointer
- binary search
- Trie
- Brute Force
- 이진탐색
- Hash
- DP
Archives
- Today
- Total
codingfarm
3. 그래픽 출력 본문
그래픽 출력도 문자열 출력과 방법은 크게 다르지 않다
아래와 같은 함수들을 사용한다.
COLORREF SetPixel(hdc, nXPos, nYPos, clrref)
DWORD MoveToEx(hdc, x, y, lpPoint)
BOOL LineTo(hdc, xEnd, yEnd)
BOOL Rectangle(hdc, nLeftRect, nTopRect, nRightRect, nBottomRect)
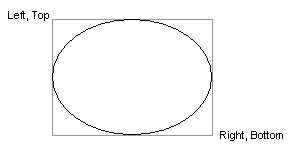
BOOL Ellipse(hdc, nLeftRect, nTopRect, nRightRect, nBottomRect)
모든 GDI 함수의 첫번째 인수는 항상 DC의 핸들인 hdc이다.
COLORREF SetPixel( HDC hdc, int x, int y, COLORREF color );
화면에 점을 출력한다.
BOOL MoveToEx( HDC hdc, int x, int y, LPPOINT lppt );
BOOL LineTo( HDC hdc, int x, int y );
선을 그을때 사용하는 함수들로, 한세트로 사용된다.
CP는 텍스트 모드의 커서같은 존재로, 윈도우즈창에서 그림을 그리기 위한 기준점 역할을 한다 볼 수 있다.
MoveToEx로 CP를 원하는 지점에 이동시키고, LineTo 함수를 통해 원하는 좌표까지 선을 긋게된다.
lppt는 이동전의 좌표를 전달하는데, 통상 이전 좌표가 필요없으므로 NULL을 전달한다.
가령 (A, B) ~ (C, D)까지 선을 긋고 싶다면, 아래처럼 두 함수를 연속으로 호출한다.
MoveToEx(hdc, A, B, NULL);
LineTo(hdc, C, D);

아래처럼 래퍼함수를 만드는것도 가능하다.
void Line(HDc hdc, int x1, int y1, int x2, int y2){
MoveToEx(hdc, x1, y1, NULL);
LineTo(hdc, x2, y2);
}
사각형을 그리는 Rectangle과 타원을 그리는 Ellipse 함수는 둘다 인수가 동일하다.
타원의 경우 지정한 두 점 (Left, Top)과 (Right, Bottom)을 대각선으로 하는 사각형을 그려 이에 내접하는 타원을 그린다.

만약 (x,y) 중심의 반지름 r의 원을 그리고 싶으면 아래처럼 호출하면 된다.
Ellipse(hdc, x - r, y - r, x + r, y + r);
|
1
2
3
4
5
6
7
8
9
10
11
12
13
14
15
16
17
18
19
20
21
22
23
24
25
26
27
28
29
30
31
32
33
34
35
36
37
38
39
40
41
42
43
44
45
46
47
48
49
50
51
52
53
54
55
56
57
58
59
|
#include <windows.h>
LRESULT CALLBACK WndProc(HWND, UINT, WPARAM, LPARAM);
HINSTANCE g_hInst;
LPCTSTR lpszClass = TEXT("TextOut");
int APIENTRY WinMain(HINSTANCE hInstance, HINSTANCE hPrevInstance
, LPSTR lpszCmdParam, int nCmdShow)
{
HWND hWnd;
MSG Message;
WNDCLASS WndClass;
g_hInst = hInstance;
WndClass.cbClsExtra = 0;
WndClass.cbWndExtra = 0;
WndClass.hbrBackground = (HBRUSH)GetStockObject(WHITE_BRUSH);
WndClass.hCursor = LoadCursor(NULL, IDC_ARROW);
WndClass.hIcon = LoadIcon(NULL, IDI_APPLICATION);
WndClass.hInstance = hInstance;
WndClass.lpfnWndProc = (WNDPROC)WndProc;
WndClass.lpszClassName = lpszClass;
WndClass.lpszMenuName = NULL;
WndClass.style = CS_HREDRAW | CS_VREDRAW;
RegisterClass(&WndClass);
hWnd = CreateWindow(lpszClass, lpszClass, WS_OVERLAPPEDWINDOW,
CW_USEDEFAULT, CW_USEDEFAULT, CW_USEDEFAULT, CW_USEDEFAULT,
NULL, (HMENU)NULL, hInstance, NULL);
ShowWindow(hWnd, nCmdShow);
while (GetMessage(&Message, 0, 0, 0)) {
TranslateMessage(&Message);
DispatchMessage(&Message);
}
return Message.wParam;
}
LRESULT CALLBACK WndProc(HWND hWnd, UINT iMessage, WPARAM wParam, LPARAM lParam)
{
HDC hdc;
PAINTSTRUCT ps;
switch (iMessage) {
case WM_DESTROY:
PostQuitMessage(0);
return 0;
case WM_PAINT:
hdc = BeginPaint(hWnd, &ps);
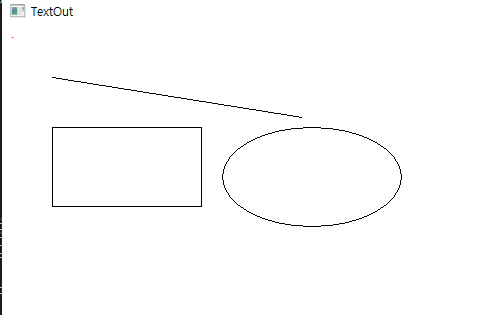
SetPixel(hdc, 10, 10, RGB(255, 0, 0));
MoveToEx(hdc, 50, 50, NULL);
LineTo(hdc, 300, 90);
Rectangle(hdc, 50, 100, 200, 180);
Ellipse(hdc, 220, 100, 400, 200);
EndPaint(hWnd, &ps);
return 0;
}
return(DefWindowProc(hWnd, iMessage, wParam, lParam));
}
|
cs |

그래픽에 대한 자세한 설명은 6장에서 보다 자세히 배운다.
'Windows > 윈도우즈 API' 카테고리의 다른 글
| 3. 메시지 비프 (0) | 2020.11.30 |
|---|---|
| 3. 메시지 박스 (Message Box) (0) | 2020.11.23 |
| 3. 문자열의 출력(TextOut, DrawText) (0) | 2020.11.19 |
| 3. DC(Device Context) (0) | 2020.11.19 |
| 2. 다양한 변형 (0) | 2020.11.17 |
Comments


