| 일 | 월 | 화 | 수 | 목 | 금 | 토 |
|---|---|---|---|---|---|---|
| 1 | ||||||
| 2 | 3 | 4 | 5 | 6 | 7 | 8 |
| 9 | 10 | 11 | 12 | 13 | 14 | 15 |
| 16 | 17 | 18 | 19 | 20 | 21 | 22 |
| 23 | 24 | 25 | 26 | 27 | 28 | 29 |
| 30 |
- 그래프
- String
- 스토어드 프로시저
- two pointer
- Stored Procedure
- Dijkstra
- MYSQL
- Two Points
- binary search
- SQL
- DP
- Brute Force
- Trie
- 다익스트라
- 이진탐색
- Hash
- union find
- Today
- Total
codingfarm
펀치 - 스켈레톤 소켓 본문
주먹으로 적을 타격하는 게임을 만든다 할때
제일 이상적인 방법은 캐릭터의 주먹에 충격을 감지할 collider를 만들고
애니메이션 재생시에 collider에 들어온 적에게 피격 이벤트를 발생시키는것이다.
이때 모델의 주먹에 collider 를 추가하기 위해서 스켈레톤 소켓을 사용할 수 있다.
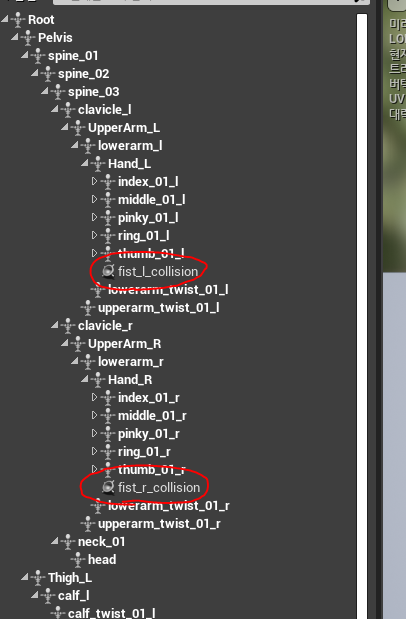
Hand_L과 Hand_R 하위에 소켓을 추가해주고, 적당한 위치를 정한다.
그리고 소켓의 위치에 Box Collider Component를 추가해준다.
|
1
2
3
4
5
6
7
8
9
10
11
12
13
14
15
16
17
18
19
20
21
22
23
24
25
26
27
28
29
30
31
32
33
34
35
36
37
|
class APunchKick02Character : public ACharacter {
UPROPERTY(VisibleAnywhere, BlueprintReadOnly, Category = Collision, meta = (AllowPrivateAccess = "true"))
class UBoxComponent* LeftFistCollisionBox;
UPROPERTY(VisibleAnywhere, BlueprintReadOnly, Category = Collision, meta = (AllowPrivateAccess = "true"))
class UBoxComponent* RightFistCollisionBox;
}
APunchKick02Character::APunchKick02Character() {
LeftFistCollisionBox = CreateDefaultSubobject<UBoxComponent> (TEXT("LeftFistCollisionBox"));
LeftFistCollisionBox->SetupAttachment(RootComponent);
LeftFistCollisionBox->SetCollisionProfileName("NoCollision");
LeftFistCollisionBox->SetHiddenInGame(false);
RightFistCollisionBox = CreateDefaultSubobject<UBoxComponent> (TEXT("RightFistCollisionBox"));
RightFistCollisionBox->SetupAttachment(RootComponent);
RightFistCollisionBox->SetCollisionProfileName("NoCollision");
RightFistCollisionBox->SetHiddenInGame(false);
}
void APunchKick02Character::BeginPlay() {
Super::BeginPlay();
// attach collision components to sockets based on transformations definitions
const FAttachmentTransformRules AttachmentRules(EAttachmentRule::SnapToTarget, EAttachmentRule::SnapToTarget, EAttachmentRule::KeepWorld, false);
LeftFistCollisionBox->AttachToComponent(GetMesh(), AttachmentRules, "fist_l_collision");
RightFistCollisionBox->AttachToComponent(GetMesh(), AttachmentRules, "fist_r_collision");
}
|
cs |
BoxColliderComponent를 만들고 이를 각각 LeftFistCollisionBox와 RightFistCollisionBox로 포인트 하도록 한다.
그리고 각 component를 RootComponent의 하위에 붙여준다.
마지막으로 누구와도 충돌이 발생하지 않게 하기 위해 CollisionProset을 "NoCollision"으로 설정한다.
게임마다 차이는 있겠지만 이번 예제에서는 주먹이 오직 적과 충돌이 발생 하게끔 해준다.
프로젝트셋팅에서 콜리전 창을 열어준다

오브젝트채널에 Weapon과 Enemy 2개의 채널을 추가한다.
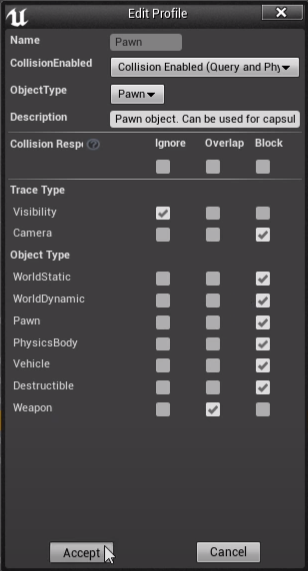
Pawn은 기본적으로 거의 모든 콜리전에 대해 막히지만 Weapon과는 겹처지게끔 위와같이 설정한다.
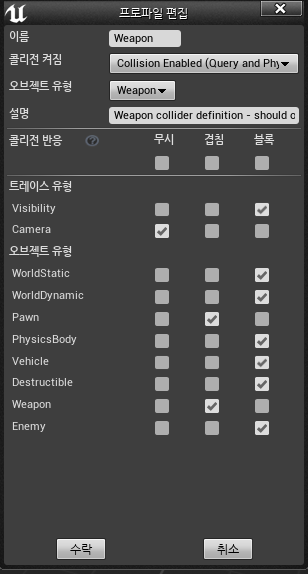
Weapon은 Pawn과 Weapon에 대해서는 겹침이 허용되게 한다.
대부분의 경우 enemy에 겹침을 적용하고 Opverlapped 감지를 통해 물리 효과를 직접 주는것이 자연스럽지만
이번예에서는 물리적으로 Enemy가 튕겨저 나가는것을 보이기 위해 블록으로 설정한다.

Enemy는 위처럼 설정한다.
Weapon이 Enemy와의 충돌을 감지할것이므로 Enemy는 Weapon을 감지할 필요가 없다.
그리고 플레이어가 공격하는 순간에만 주먹의 Collision proset이 "weapon"이 되고, 평상시엔 "NoCollision"이 되게끔 해서 불필요한 판정을 최소화 시키게끔 한다.
|
1
2
3
4
5
6
7
8
9
10
11
12
13
14
15
16
17
18
19
20
21
22
23
24
25
26
27
28
29
30
|
void APunchKick02Character::AttackInput() {
Log(ELogLevel::INFO, __FUNCTION__);
// generate number between 1 and 3:
int MontageSectionIndex = rand() % 3 + 1;
// create a montage section
FString MontageSection = "start_" + FString::FromInt(MontageSectionIndex);
PlayAnimMontage(MeleeFistAttackMontage, 1.f, FName(*MontageSection));
}
void APunchKick02Character::AttackStart()
{
Log(ELogLevel::INFO, __FUNCTION__);
LeftFistCollisionBox->SetCollisionProfileName("Weapon");
RightFistCollisionBox->SetCollisionProfileName("Weapon");
}
void APunchKick02Character::AttackEnd()
{
Log(ELogLevel::INFO, __FUNCTION__);
LeftFistCollisionBox->SetCollisionProfileName("NoCollision");
RightFistCollisionBox->SetCollisionProfileName("NoCollision");
}
|
cs |
공격이 시작되는 순간 AttackStart()를 호출하고, 끝날무렵 AttackEnd()를 호출하면 된다.
하지만 애니메이션에 따라 실질적인 공격 시작시점과 끝나는 시점은 다 다르므로 코드영역에서 이를 일일이 감지하기란 쉽지않다. 그렇기에 NotifyState를 이용한다.
|
1
2
3
4
5
6
7
8
9
10
11
12
13
14
15
16
17
18
19
20
21
22
23
24
|
// Fill out your copyright notice in the Description page of Project Settings.
//AttackStartNotifyState.h
#pragma once
#include "CoreMinimal.h"
#include "Animation/AnimNotifies/AnimNotifyState.h"
#include "AttackStartNotifyState.generated.h"
/**
*
*/
UCLASS()
class PUNCHKICK02_API UAttackStartNotifyState : public UAnimNotifyState
{
GENERATED_BODY()
public:
virtual void NotifyBegin(USkeletalMeshComponent* MeshComp, UAnimSequenceBase* Animation, float TotalDuration) override;
//virtual void NotifyTick(USkeletalMeshComponent* MeshComp, UAnimSequenceBase* Animation, float FrameDeltaTime) override;
virtual void NotifyEnd(USkeletalMeshComponent* MeshComp, UAnimSequenceBase* Animation) override;
};
|
cs |
|
1
2
3
4
5
6
7
8
9
10
11
12
13
14
15
16
17
18
19
20
21
22
23
24
25
26
27
28
29
30
31
32
33
34
35
|
// Fill out your copyright notice in the Description page of Project Settings.
//AttackStartNotifyState.cpp
#include "AttackStartNotifyState.h"
#include "PunchKick02Character.h"
#include "Engine.h"
void UAttackStartNotifyState::NotifyBegin(USkeletalMeshComponent* MeshComp, UAnimSequenceBase* Animation, float TotalDuration){
GEngine-> AddOnScreenDebugMessage(-1, 4.5f, FColor::Magenta, __FUNCTION__);
if (MeshComp != NULL && MeshComp->GetOwner() != NULL) {
APunchKick02Character* Player = Cast<APunchKick02Character>(MeshComp->GetOwner());
if (Player != NULL) {
Player->AttackStart();
}
}
}
/*
void NotifyTick(USkeletalMeshComponent* MeshComp, UAnimSequenceBase* Animation, float FrameDeltaTime){
}
*/
void UAttackStartNotifyState::NotifyEnd(USkeletalMeshComponent* MeshComp, UAnimSequenceBase* Animation){
GEngine->AddOnScreenDebugMessage(-1, 4.5f, FColor::Magenta, __FUNCTION__);
if (MeshComp != NULL && MeshComp->GetOwner() != NULL) {
APunchKick02Character* Player = Cast<APunchKick02Character>(MeshComp->GetOwner());
if (Player != NULL) {
Player->AttackEnd();
}
}
}
|
cs |
NotifyState에서 MeshComponent를 소유중인 actor의 character를 추적하여
NotyfiyState의 시작과 끝에 AttackStart()와 AttackEnd()를 호출하게끔 한다.

그리고 공격 애니메이션 몽타주에서 각 섹션의 타이밍에 맞추어 NotifyState를 삽입한다.
이제 테스트 준비를 해보자
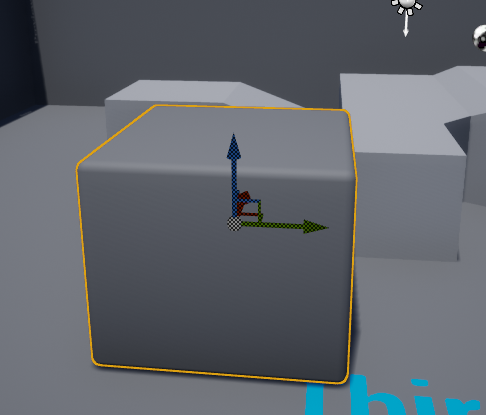
맵 한가운데에 보이는 큐브를
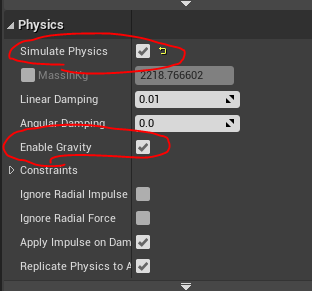
Simulate Physics와 Enable Gravity를 true로 설정하고
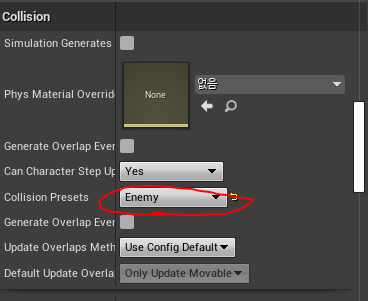
Collision Presets를 Enemy로 설정한다.
이제 테스트 해보면
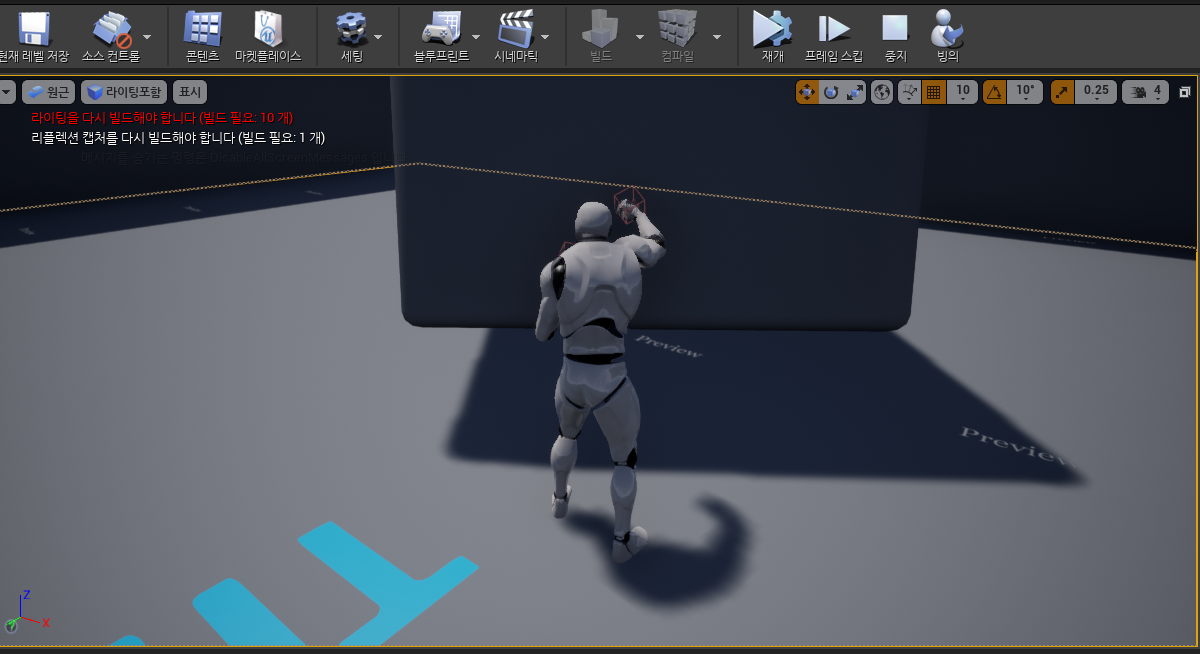
주먹질과 함께 박스가 허공에 뜨는것이 확인되었다.
'Unreal 4 > 기타' 카테고리의 다른 글
| 펀치 - 소리 재생 (0) | 2020.07.20 |
|---|---|
| 펀치 - 충돌 이벤트(Hit Event) (0) | 2020.07.20 |
| 펀치 - 애니메이션 몽타주 (0) | 2020.07.18 |
| 애님 에셋 리타게팅 (0) | 2020.07.18 |
| World Space to Local Space (0) | 2020.07.18 |
